1. Select and open your image that has already been processed in whatever program you use to process your work, for me it's Photoshop. I'll start with the image below.
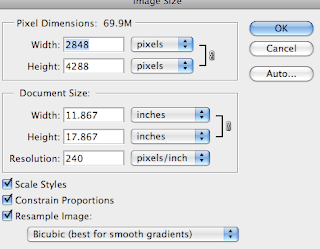
2. Select a texture layer from a source, either ones you have made or from some free download sites. I selected this texture for its look and compatability in coloring with the original shot. Size the texture image file to the same as your original image resolution and dimensions, in Photoshop too. (I assume you will know how to do resize the image.)

3. While on the texture layer with it open choose the "Select" "All" option from the menu in PS and you will see marching ants (dashed lines) around your image.
4, Once you have the texture selected then go to the Edit menu and choose Copy.
 5. Returning to the original file, make a new layer..by selecting the new layer icon
 Then click on the new layer in the layer palette to activate it and go to Edit "Paste".
You will see the texture appear in the the new layer window. Note the opacity and fill sliders at the top of the layers window have been adjusted Opacity to 83% and fill to 95%. This will be different in each image you process, its a matter of taste, but I encourage you to move the slider to your taste. The image with the reduce opacity and fill will look something like this.....
6. At this stage I might tweek the curves of the texture layer to get a look I like.
7. Once the opacity and fill have been adjusted I then add a layers mask to that layer. By clicking on the mask icon at the bottom of the layers palette here:
You will see a blank window appear next to the layer.
7. Activate the mask by clicking in it, and then with the foreground color selected as black, select a soft brush fairly large and and a low opacity say 10% to begin with and increase opacity as desired...paint out the texture where you want to reveal the original image.
8. Because I reduced the opacity of the texture layer, the petals began to show through around the outer edges of the image, so I went back and put a fill layer of 100% black around the outside of the image, by selecting the entire image and choosing from the tool bar Edit Fill. I then used the rectangular marquee to make a fine selection and then hit the delete key, leaving only the black edge in place.
So that's basically it, with minor tweeks.
9. Here is the final image from this process. If I missed a step or didn't explain clearly please don't hesitate to ask..
10. Now I had some time tonight to learn a little more in Photoshop, and played with frames...from this tutorial...http://www.youtube.com/watch?v=1cfP3d1yhZw
It took me a while, switching between Photoshop and the tutorial......but I finally got it...only difference is that on the color layer I decided to run it through Snapart2 to give the color layer some texture....
Might come in handy for some special hoiliday card applications!


Thanks, I will have to try layers. Have not ever done them before, I do not do much manipulating on my photos. But I like the look, it is a good decorator item.
ReplyDeleteThanks James, it is interesting you reference the "decorator" look, as my first love in art was interior design and home decor, I think it still rules my thoughts! Hope you have some fun with the process.
ReplyDeleteVery well done tutorial. The image looks great.
ReplyDeleteThanks very much Bob!
ReplyDelete