First process your image and save the file. Then when you have your image open in Photoshop go to the menu bar and under image click on canvas size. (not rotate canvas, sorry its highlighted)

Once you have that menu open the canvas size dialog box will be on your screen. The box below shows the current canvas size, which is the actual dimension of your photo. To add white space around your image you will need to increase the size of the canvas. For an image this size I will add two inches all the way around the image first by changing the dimensions of the canvas size in the width and height fields.

I add the two inches simply by increasing the width and height, as below.

Once you do that your image will look like this.
 After you have done that, go back to image; canvas size; and add some depth to the bottom of the canvas by increasing the height, I use another inch on an image this size, when you do that you will need to indicate on the anchor dialog box the direction to add space, it's opposite the side you actually want the space added to. Notice the arrows and how they are positioned compared to the original anchor box. By clicking on the top arrow you will get an anchor box that looks like the one below.
After executing that you image should look like this.

That's it for the canvas, now make a new layer, by clicking on the new layer icon,

in the layers dialog box.

Once you have made a new layer, go to the rectangular marquis tool and click on it to activate it.
Click just outside the top left corner of you image and drag a thin line around the image, you will see the marching ants around your image like this:
 After you have the marching ants around your image go to the menu bar and click on edit and select stroke.
 When you click on stroke a dialog box will appear as follows. Make a selection of width, I use 5px, then select your color, since I work on a Mac I use the color picker and grab a color sample from the image I think will enhance the image, I check "center" for the stoke depth, and choose a blending mode, the one here is the last one I used. Then hit OK. The border will be there but not so noticeable under the marching ants.
After that I make a new text layer
 to add my name to the lower right corner, using "Minion Pro" in italics, and set the opacity in the layers box to 50-70%
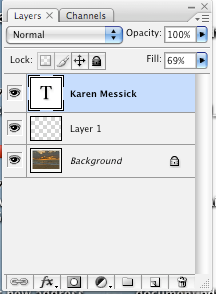 Then I make a new text layer for the name of the image, using Trojan Pro lettering. I enhance the text by clicking on the fx in the layers text box
 to add my name to the lower right corner, using "Minion Pro" in italics, and set the opacity in the layers box to 50-70%
  Then I make a new text layer for the name of the image, using Trojan Pro lettering. I enhance the text by clicking on the fx in the layers text box
 Click on Bevel and Emboss and you get a box like this, move the sliders until you have a desired effect.
 The last step is to flatten the image and size as needed.
Hope that helps, and if you want to add color to the canvas in the canvas dialog box there is a color choice box on the bottom just click in it and make alternate selections. You can also use custom color here by picking a color from the image.
Hope that helps, and thanks for stopping by my web and blog!
Karen - I'm setting up a booth in a crafts mall in Berkeley Springs. Nora is busy putting the photos in mats which is very time consuming.
ReplyDeleteIt would be much easier to print the '5x7' onto an '8x10' with a mat border around it which includes the photo title and signature.
It would cost 'about' the same on most of the prints. Of course, I'd still have to supply the backing and glassine; however, it would be much quicker to put the inventory together for the store in WV and for any local shows we do.
Well, that's a project! Good luck and I hope the revenue streams in!
ReplyDelete